Mar 13, 2016

Func, Action, Predicate and the confusion

Today, I will explain few things that I've personally had lots of difficulties, at first, understanding and then while applying.

As all the three things that I'll be discussing are delegates, let's first see what exactly a delegate is.

What is a DELEGATE?

To understand delegates, I got this wonderful real-world scenario stated here, which I'm quoting below.
"When a Head of State dies, the President of the United States sometimes does not have time to attend the funeral personally. Instead, he dispatches a delegate. Often this delegate is the Vice President, but sometimes the VP is unavailable and the President must send someone else, such as the Secretary of State or even the First Lady. He does not want to 'hardwire' his delegated authority to a single person; he might delegate this responsibility to anyone who is able to execute the correct international protocol.
The President defines in advance what responsibility will be delegated(attend the funeral), what items will be passed(condolences, kind words), and what value he hopes to get back(good will). He then assigns a particular person to that delegated responsibility at "runtime" as the course of his presidency progresses."

Delegates in our programming world also behave in somewhat similar fashion.

MSDN talks about delegate as follows:-
"delegate is a reference type that can be used to encapsulate a named or an anonymous method. Delegates are similar to function pointers in C++; however, delegates are type-safe and secure."

So, a delegate is a reference type, as opposed to a value type, which is used to encapsulate a named or an anonymous method. As we know, an anonymous method is nothing but a method for which we have not provided any name and is provided by the compiler itself.

The most common example that we have for delegates are event handlers. In ASP.NET WebForms, we create a control and bind event handlers for various of its events. Here, effectively, we are just binding the event handler methods.

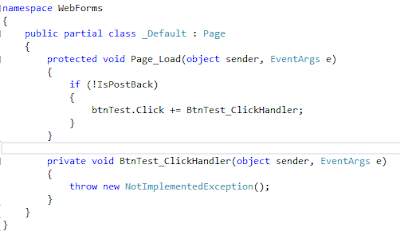
As we can see in the picture above, after registration, this BtnTest_ClickHandler sits there calmly and quietly, doing nothing until the event is triggered. As soon as the event is triggered, the click handler goes and executes the code inside itself.

So, if you want to perform some action at some later point-in-time or after some event, go ahead and create a delegate. Now, create a method which takes care of your action. This method needs to have the same signature as that of the delegate. Then, just wire up the two(delegate and method). That's all. Whenever you need to perform that action, just invoke the delegate with appropriate parameters and the target method will be invoked.


Func

Func is just a parameterised delegate which accepts zero or more inputs but definitely returns an output. So, effectively, if you have a scenario where you want to return an output, go for Func.

The most common scenario where we use Func is when we are filtering a list using Where condition.

Here, since my list is of type int, Where expects int as the input and will return a bool as the output.


Action

Action is also a parameterised delegate which accepts zero or more inputs but does not return an output. So, if you don't want to return an output, go for Action.

The most common scenario where we use Action is an event handler. We provide the method with parameters such as the sender and EventArgs but the method does not return any value(as shown in the first image above).


Predicate

Predicate is nothing but a specialized Func where the return type is always a bool.
So, effectively, Predicate is just a Func<T, bool>.

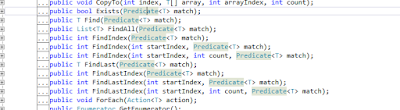
Some of the functions inside List expect Predicates as a parameter to be passed to them, as shown below.


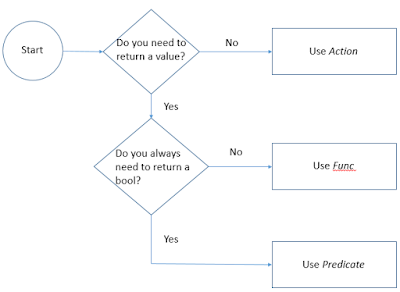
The flowchart below should help you decide when to choose which delegate even better.


So, that's all there is to these confusing terms.

Hope this helps.


Mar 11, 2016

Why and How to begin with Git!

It's been hectic past few days and I didn't get a chance to write any blog. Busy with my project work, I got very little time for anything else.

Today, let's check out Git and how it can be useful for us.

I have split this blog into the following sections:-
  1. What is Git?
  2. Why should we use Git?
  3. Getting started with Git.

What is Git?


As the first sentence on the homepage of Git says, it is a free and open source distributed version control system.

Let's look at what this line means.

Free and Open Source - Git uses the GNU General Public License version 2.0. This license ensures a lot of things, few of which are:-
i) The source code should be present.
ii) Anyone who possesses this software can redistribute it without having to pay any fees or royalty.

Distributed Version Control System - For most of us who have worked on MS stack, TFS is one of the most popular version control systems. 
TFS is an example of a Centralised Version Control System(CVCS). What this means is that we have one server which maintains the code base and all the users connect to that server for any operation. 
In a Distributed Version Control System(DVCS), we have one repository from which all the users clone the code onto their own systems. Due to this, the user does not need to contact the server for each operation and lot of operations can be done locally. Also, this creates multiple copies of the code and in the event of any crash of the central repository, we can easily restore the data from any of the user.

If you see the URL of the link to Git above, it says http://git-scm.com.
What is scm? SCM stands for Software Configuration Management. This is a term used to describe the process of tracking and controlling changes in the software.


Why should we use Git?


Git offers a lot of benefits to its users:-  
  1. Almost all the operations in Git are performed locally. Due to this, any operation in Git appears lightening fast to someone like me, coming from TFS background(CVCS).
  2. Another reason for Git being so fast is that it is written in C. This removes the overhead of runtime associated with higher-level languages.
  3. The best feature of Git is the way it handles branching and merging. Git actually encourages users to create multiple local branches and since any such operation takes just seconds, it's very convenient. So, you can create a branch for any new thing you want to try or a bug you want to fix or anything like that. 
  4. For every file or commit that we make to Git, a checksum is calculated and associated with it. This ensures the integrity of the file. It ensures that you get only what you have put in the file.
  5. Git offers a concept of Staging area. This acts as an intermediate area where we can consolidate our changes before actually committing them. We can always choose to override this option, if we want.
  6. When you clone a copy of the repository on your local system, you are getting the entire history of the changes made in the repository. You can compare and check the history of any file even when you are not connected to the internet. That is a really cool feature. 
  7. The open-source community on Github(code-hosting platform for version control and collaboration) is very active. There are so many amazing open-source projects hosted on Github. Following are few examples but you can check many more interesting ones. 
  • Linux - Git started off as a version control system for Linux. The code here is in C but do go through bits of it if you get a chance. 
  • Roslyn - This is the .NET Compiler platform for C# and Visual Basic. 
  • .NET Core - It is subset of the .NET Framework which was created so that it can be open-source and be cross-platform. 
  • EF Core - It is the ORM provided by Microsoft which can be used on top of .NET Core to build cross platform applications. Though it is still in prerelease and will take time to mature, we can always go and check out the code. 
  • AutoMapper - This is the object mapper which is frequently used in .NET projects. 


Getting started with Git


We will see the following basic operations that we can perform on Github.
  1. Create a Repository
  2. Create a Branch
  3. Make changes to a file and push them as commits
  4. Open and merge a pull request

Before all this, we need to have a Github account. So, sign up for free and get a Github account.
For simulating two different users, I have created two Github accounts(roshan-kumar001 and rks-hs001).
Following is the Github homepage when we log in.


1) Create a Repository - We can create a new repository as shown below.


Here, we select Public repository for a free account. If you have a paid account, you can go for a Private repository as well. As the name suggests, anything you store in a Public repository can be accessed by anyone else. We select the checkbox to initialize the repository with a README.md file.


2) Create a Branch - Creating a branch is as simple as shown below.


3) Make changes to the file and push them as commits.
Here, I would just demonstrate changes to the README.md file which is already added to the project but you can have the whole Visual Studio solution and the same concept would apply(Though it does involve adding of file and extension types to .gitignore, I will take it up in a separate blog maybe).
We can make changes to the README.md file using the Edit link as shown below.

Add a new line to this file as shown below and commit the changes.


4) Open and merge a pull request.
Now, I log in with another account and search for the new repository I just created. Go to the develop branch, as shown below.

Edit the README.md file and add a line of text to it.

On updating the changes, it asks for us to compare the files and to create a Pull Request which sends a notification to the base repository owner.

On my original repository, we get a notification informing about the Pull Request as shown below.

Since this file does not have a conflict, we can directly merge it. Else, we'll get merge conflict option where we can merge the two files.


This is the basic workflow of how a lot of open-source projects on Github work. So, as soon as you understand this, you can check them out and even start contributing to it. Go out and explore Github and the amazing projects that are present on it. I'm sure it'll help all of us in becoming better developers.

I hope this article provides the basics of Git and helps you to get started on Github.


Feb 21, 2016

Editing Visual Studio scaffoldings


Few days back, I was working on an OData project and encountered a problem.

Problem: 
I created an OData application(without MVC) through the default template provided by Visual Studio. Then, I added a Controller using the default scaffolding Web API 2 OData v3 Controller with actions, using Entity Framework. After that, I set up the DB to be accessed by this Controller. 

Then, I checked my OData API for the simplest request(get all records of an entity). It returned HTTP 406 as the response code. I looked up this response code and found as follows:-
"The resource identified by the request is only capable of generating response entities which have content characteristics not acceptable according to the accept headers sent in the request."
W3Org
This means to say that the OData service is returning the response in a format which is not being specified in the Accept header of the request.
I checked all that, passed application/json as Accept header myself, and tried few other things. Nothing worked.


Solution:
Finally, after some googling I found that we just need to replace the using System.Web.Http.OData; with using System.Web.OData; in the controller. That's all.


Fixing the root cause of the problem:
So, I was thinking about this problem and figured that because my scaffolding has this issue, it'll generate an incorrect code every time I add an OData controller. I know it's trivial but why not fix the root cause of the problem.

So, let's see how to edit the scaffolding in Visual Studio 2015. It'll be similar in other versions of VS as well.

1) Following is the existing namespace which is generated with the faulty scaffolding.
2) On my system, I have the following scaffoldings installed for Controllers. I will just fix the OData controller scaffoldings.
3) If you have done default installation for Visual Studio, then the scaffolding folder will reside in the following location(you need to change the Visual Studio version depending on the version installed)
C:\Program Files (x86)\Microsoft Visual Studio 14.0 \Common7\IDE\Extensions\Microsoft\Web\Mvc\Scaffolding\Templates
Here, we can see all the different scaffoldings. I have selected the two scaffoldings that we'll fix now.
4) Inside each folder, we can find scaffoldings corresponding to each language which it can generate.
5) We will go ahead and edit the C# scaffolding. Shown below is the culprit line in the C# scaffolding.
We just update this line from using System.Web.Http.OData; to using System.Web.OData;.
6) Now, the template generates the correct using namespace, as shown below.

So, the next time I create an OData controller, I will not have to worry about getting the wrong using namespace. :)

Hope this help!

Jan 30, 2016

Create your own Powershell module and cmdlet

In this blog, let us see how we can create a module and cmdlets inside it. We will be using Powershell ISE(Administrator) to do this.

First, we will create a cmdlet and then a module.

Create a cmdlet

1) Prepare the script which you want to expose as a cmdlet. For demo purpose, I will use the following.


2) Switch to Script mode(Ctrl+R) and save this script with an extension .ps1


3) Parameterize out the things that might change by using the keyword param.

4) Switch to the console mode(Ctrl+R) and check the help content that is being built for this file.

5) It is showing that our parameter searchTerm is a generic Object type. Suppose, we want it to be a string. We can do it like this.

Now, the Get-Help shows the expected type as a string.

6) We can also decorate our script with CmdletBinding attribute as shown. This gives us extra built-in functionalities like Verbose, Debug etc.


7) To provide properly formatted and additional help for our cmdlet, we can add our inputs in comments on top of the cmdlet. Whatever we mention in the synopsis will be displayed in synopsis section of Get-Help and likewise.


8) Now, except the additional help section, we can enclose the whole thing inside a Function with a name having format Verb-Noun, here Get-MyProcesses.


We also have a template for cmdlets. On the script tab, just press Ctrl+J and select the cmdlet option and get the following.


So, now, we have successfully created our cmdlet. How do we use it?
We can use it by importing the .ps1 file and calling the Get-MyProcesses cmdlet.


We would like to make it more standardised so that we can package our cmdlets inside a module and share it with others.


Create a Module

1) Now, just do a Save-As on the script file that you created. Save it with .psm1 extension. This is our module.

2) We can get all the Module paths in Powershell using the following command. We should deploy our module in the first path i.e. one which is specific to the logged-in user.

3) We need to create this path if it's not already there. Also, we need to have a folder inside Modules folder with name same as the script file name(here, MyScript).

4) Now, copy the package(.psm1) from where you created it to this location.

5) That's all. Now, our module and the associated cmdlets are ready for use.


Hope this helps!

Jan 24, 2016

Setting up Unity Framework in an MVC application

In this blog, let us see how we can set up Unity Framework in our MVC application.

Let us create an MVC application. I would build a simple application where we can view all the employees, add an employee, edit an employee and delete an employee.


If we check the references, we'll find that Unity Framework DLLs are not added by default. So, let's go ahead and add them.
Open up the Package Manager Console(Tools -> NuGet Package Manager -> Package Manager Console) and type the following.
install-package Unity
This will add the following four references to our solution.


We would also need to initialize the container which, in this case, is Unity. For this, let's install another package by using the following command on the Package Console Manager.
install-package Unity.Mvc5
This will add UnityConfig.cs file in the App_Start folder of our application with the following content.

Here, we can see that the UnityContainer is being instantiated. We can register the types and instances in this file. Also, the UnityDependencyResolver is instantiated with the container which has been registered with all the types and instances.

The method RegisterComponents() needs to be called from the Application_Start in Global.asax.cs.


Now, let's do the changes on the MVC side of things.

Let's build our Employee model first and place it in Models folder.

Also, add another file called CompanyDBProvider in the Models folder for reference to the DbContext object.


Let's create a folder for Repositories and add an interface for the repository with the basic functionalities.

Now, let's create the EmployeeRepository which implements all these functions. Below is a snapshot of how we can use the CompanyDBProvider to get the values.


Now, we'll create the EmployeeController with MVC 5 Controller with read/write actions template. There are 3 ways by which we can inject dependencies in Unity as listed below. I prefer constructor injection but let's see all three.
i) Constructor injection - No decoration required.

ii) Property injection - We need to decorate the property with [Dependency] attribute.

iii) Method-call injection - We need to decorate the property with [InjectionMethod] attribute.


Just the last part now, register our newly created component.


Finally, let's test the application.
Run the application, put a breakpoint in the EmployeeController's constructor and hit Employee/Index.


As we can see, EmployeeRepository is being injected into our application by the container(Unity).

Hope this helps.