Jan 30, 2016

Create your own Powershell module and cmdlet

In this blog, let us see how we can create a module and cmdlets inside it. We will be using Powershell ISE(Administrator) to do this.

First, we will create a cmdlet and then a module.

Create a cmdlet

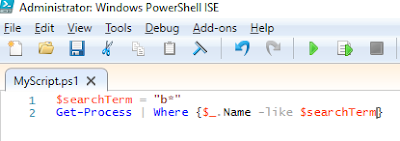
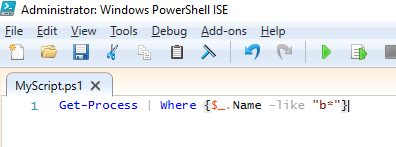
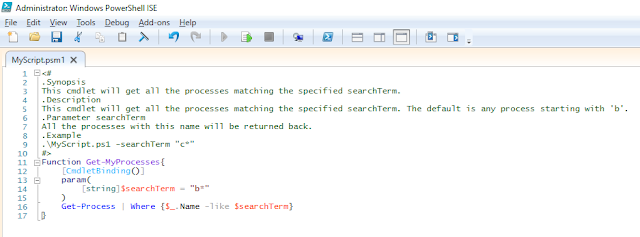
1) Prepare the script which you want to expose as a cmdlet. For demo purpose, I will use the following.


2) Switch to Script mode(Ctrl+R) and save this script with an extension .ps1

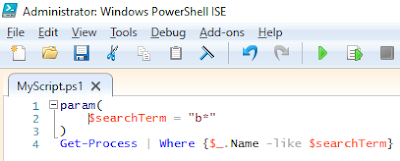
3) Parameterize out the things that might change by using the keyword param.
4) Switch to the console mode(Ctrl+R) and check the help content that is being built for this file.

5) It is showing that our parameter searchTerm is a generic Object type. Suppose, we want it to be a string. We can do it like this.
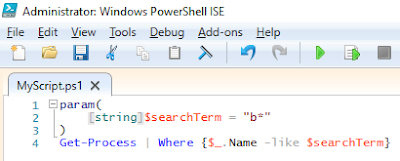
Now, the Get-Help shows the expected type as a string.

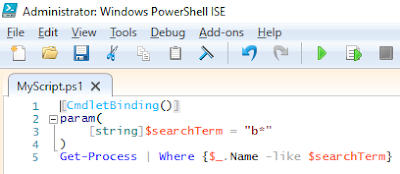
6) We can also decorate our script with CmdletBinding attribute as shown. This gives us extra built-in functionalities like Verbose, Debug etc.


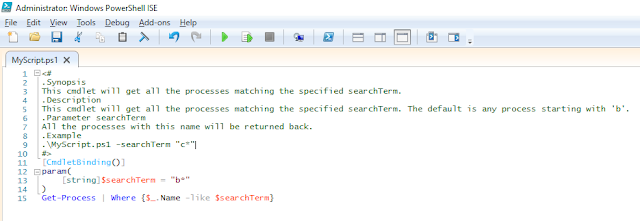
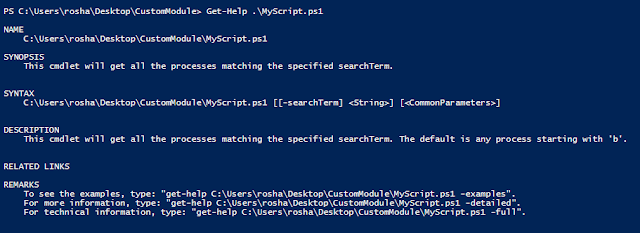
7) To provide properly formatted and additional help for our cmdlet, we can add our inputs in comments on top of the cmdlet. Whatever we mention in the synopsis will be displayed in synopsis section of Get-Help and likewise.
8) Now, except the additional help section, we can enclose the whole thing inside a Function with a name having format Verb-Noun, here Get-MyProcesses.

We also have a template for cmdlets. On the script tab, just press Ctrl+J and select the cmdlet option and get the following.
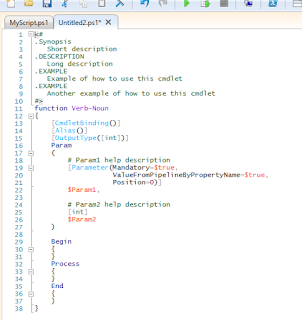

So, now, we have successfully created our cmdlet. How do we use it?
We can use it by importing the .ps1 file and calling the Get-MyProcesses cmdlet.


We would like to make it more standardised so that we can package our cmdlets inside a module and share it with others.

Create a Module

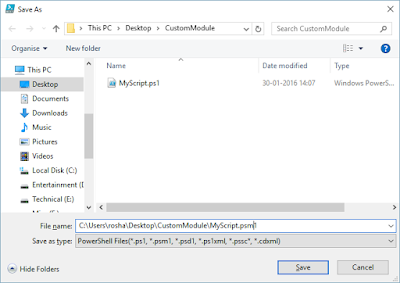
1) Now, just do a Save-As on the script file that you created. Save it with .psm1 extension. This is our module.

2) We can get all the Module paths in Powershell using the following command. We should deploy our module in the first path i.e. one which is specific to the logged-in user.

3) We need to create this path if it's not already there. Also, we need to have a folder inside Modules folder with name same as the script file name(here, MyScript).

4) Now, copy the package(.psm1) from where you created it to this location.

5) That's all. Now, our module and the associated cmdlets are ready for use.


Hope this helps!
Jan 24, 2016

Setting up Unity Framework in an MVC application

In this blog, let us see how we can set up Unity Framework in our MVC application.

Let us create an MVC application. I would build a simple application where we can view all the employees, add an employee, edit an employee and delete an employee.


If we check the references, we'll find that Unity Framework DLLs are not added by default. So, let's go ahead and add them.
Open up the Package Manager Console(Tools -> NuGet Package Manager -> Package Manager Console) and type the following.
install-package Unity
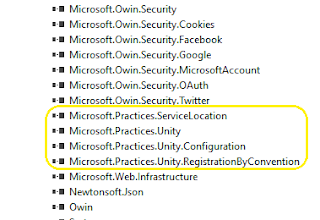
This will add the following four references to our solution.


We would also need to initialize the container which, in this case, is Unity. For this, let's install another package by using the following command on the Package Console Manager.
install-package Unity.Mvc5
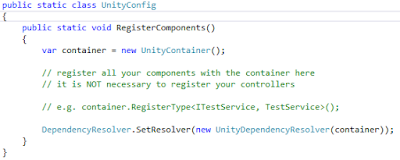
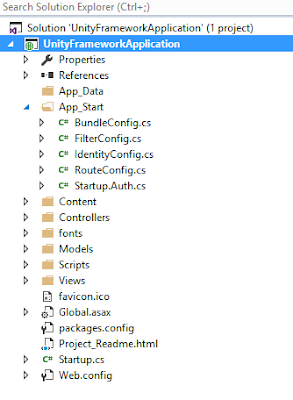
This will add UnityConfig.cs file in the App_Start folder of our application with the following content.

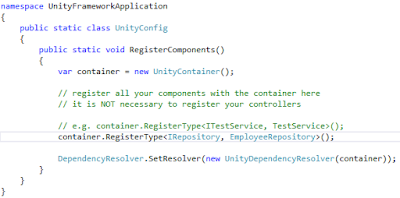
Here, we can see that the UnityContainer is being instantiated. We can register the types and instances in this file. Also, the UnityDependencyResolver is instantiated with the container which has been registered with all the types and instances.

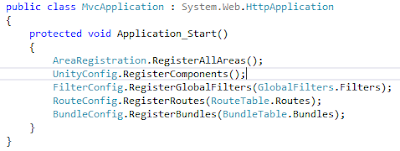
The method RegisterComponents() needs to be called from the Application_Start in Global.asax.cs.


Now, let's do the changes on the MVC side of things.

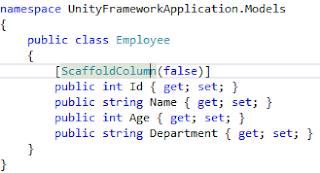
Let's build our Employee model first and place it in Models folder.

Also, add another file called CompanyDBProvider in the Models folder for reference to the DbContext object.


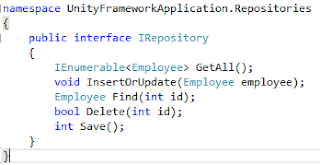
Let's create a folder for Repositories and add an interface for the repository with the basic functionalities.

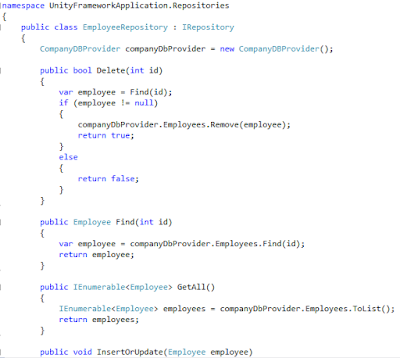
Now, let's create the EmployeeRepository which implements all these functions. Below is a snapshot of how we can use the CompanyDBProvider to get the values.


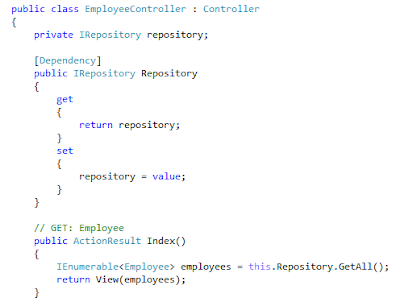
Now, we'll create the EmployeeController with MVC 5 Controller with read/write actions template. There are 3 ways by which we can inject dependencies in Unity as listed below. I prefer constructor injection but let's see all three.
i) Constructor injection - No decoration required.

ii) Property injection - We need to decorate the property with [Dependency] attribute.

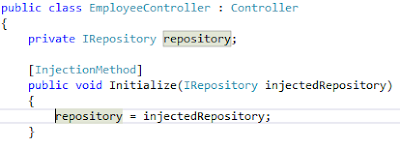
iii) Method-call injection - We need to decorate the property with [InjectionMethod] attribute.


Just the last part now, register our newly created component.


Finally, let's test the application.
Run the application, put a breakpoint in the EmployeeController's constructor and hit Employee/Index.


As we can see, EmployeeRepository is being injected into our application by the container(Unity).

Hope this helps.

Jan 23, 2016

Message while debugging - Function evaluation requires all threads to run

Today, I was working on some project with Entity Framework 6.1.3 and got the following error.


To navigate through this, I just clicked the refresh icon which was shown at the beginning of the message. This displayed the expected value of that instance.

This message isn't exactly an error rather a feature of the debugger. Let's see how.

One of the risks of evaluating the properties using a debugger is that the system might enter an inconsistent state.
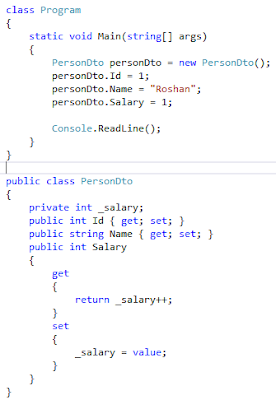
e.g. Let us consider a hypothetical scenario as shown below where the _salary variable is incremented and returned every time the get accessor is called.


Here, when I keep a breakpoint on Console.ReadLine() and try to find the value of personDto.Salary, as expected, it changes every time.


This is a simple example where the code evaluation takes place on the same thread. However, this is not always the case. Sometimes, the code might need to be evaluated in a separate thread e.g. a remote call. The debugger does not perform this function automatically, it asks for your permission. If you click the refresh icon, it goes ahead and executes the code required to fetch the value of the variable.


Technically, while debugging when we hit the breakpoint, all the threads other than the one on which the application is running are frozen. So, if we need a code to be executed which requires a separate thread, it will create a deadlock. This scenario is prevented by a mechanism where the debugger allows only 5 seconds of time to the evaluation code. If the evaluation code cannot return any value within those 5 seconds, the debugger returns a Function evaluation timed out. message.

It is obviously little irritating to wait for 5 seconds and then get to know about Function evaluation timed out. To prevent that, we have a notification mechanism which can tell that a particular execution requires other threads as well and might take time.
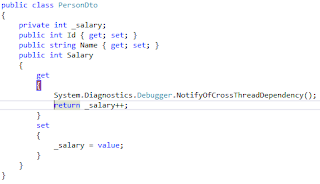
System.Diagnostics.Debugger.NotifyOfCrossThreadDependency() method is used to perform this function. We can add this method to the properties where we, as developers, feel that it might take more time as shown below.


It shows us the message for the Salary property.


If we still go ahead and evaluate it, it'll show us the value.


Hope this helps.

Jan 16, 2016

NuGet - Create, Host and Reference a package

Yesterday, for the first time, I came across a scenario where I had to reference and build the project using a NuGet package exposed from a local or shared path.

I faced few issues while trying to do this. Let's walk through the process in this blog.
This setup involves following three steps:-

1. Create a NuGet package. Usually, we consume packages already created by some third-party, but here, I want to demonstrate the creation of NuGet packages also.

2. Host the NuGet package
  • As official NuGet feeds library 
  • As local feeds.
3. Reference the NuGet package in the client application.

1. Create a NuGet package:-


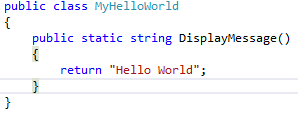
For this blog, I created a simple Class Library with the following function in it.


Then, I created the DLL in Release mode.

Now, I opened Package Manager Console from the following path in Visual Studio.
Tools -> NuGet Package Manager -> Package Manager Console.

Check the Package Source and Default Project selected in the Package Manager Console. By default, the location for package source will be nuget.org and your current project as the default project. 

You can check the packages installed for your project by using Get-Package cmdlet in the Package Manager Console. Initially, my class library did not have any packages installed on it. 

Now, I executed the command to create the nuspec file and got the following error.
nuget spec HelloWorld.dll

After some searching, I found that I was missing the NuGet command-line package. So, I installed that.
install-package nuget.commandline

Then, I was able to create the nuspec file.
nuget spec HelloWorld.dll

After that, I had to edit the nuspec file with all the relevant details viz. id, version, title, author etc.


Then, I had to create the package using the following command.
nuget pack HelloWorld.nuspec

See all those warnings?! Like a true developer, I didn't even bother reading those warnings as soon as I saw that "Successfully created package" message ;) 
But, we'll see how I had to redo the whole process due to this mistake.


2. Host the NuGet package:-


We can host our NuGet packages in the following two ways:-

i) As official NuGet feeds library - For this, we need to sign up on nuget.org and get an API key. After this, we just need to upload our package on this website using the API key and that's it. We can search the package up in the Client application and use it.

ii) As local feeds - We need to place the package in some path and go to the Package Manager Settings from the Package Manager Console. Here, we need to add another source path from where we can get NuGet packages as shown below.


3. Reference our new NuGet package in the client application:-


Let's create a new simple console application to consume our new package now.
Using the Package Manager Console, change the source of packages from nuget.org(default) to HelloWorld Package. It will show us our new package.

Now, we need to install this package. I tried doing that but got the following error.

This is where overlooking those warnings(like a true developer) came back to haunt me..!! ;)

Finally after some searching, I got this link which tells about the convention that we need to follow in order to build a proper package.

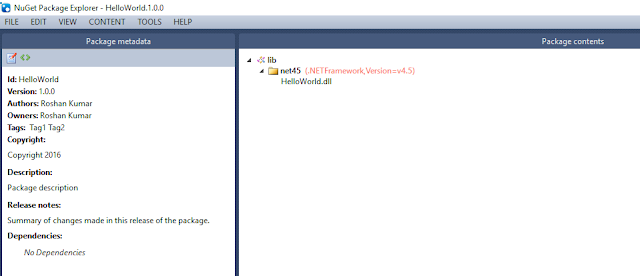
To check the contents of any nupkg file, you can use NuGet Package Explorer. This is something similar to ildasm for a package.


After going through the link, I restructured the folder where I had placed my DLL as shown below. Here, the net45 folder is used as I had built the console app targeting .NET Framework 4.5. More details on the conventions for this folder structure are provided here.

Now, follow the steps from beginning and create the package again. That's all.

After that, referencing the DLL in the new project works like a charm..!! :)


Hope this helps.